Contents
Overview
This document covers the step-by-step process for exporting an iMovie ’11 (version 9) project as a self-contained video file on Mac OS X.
Note: iMovie ‘11 projects are mostly compatible with Final Cut Pro 7 and Final Cut Pro X but not vice versa. iMovie ‘11 projects can be imported into Final Cut Pro 7 and then into Adobe Premiere Pro but not vice versa.
Before you get started
- GroundWorks does not have any means of long-term storage for your files. User files on a GroundWorks computer are not safe from deletion. It is highly recommended to bring an external hard drive on which to store all your files. External hard drives are available for purchase at the Computer Showcase.
- It is recommended that you work on your project from your external hard drive.
- The exporting process includes fully rendering and saving your project as a self-contained video file and will take time depending on the settings, complexity, processing power, and other factors.
- Learn more about iMovie ’11 by using the tutorials at Apple.com. Learn everything you need to know about iMovie ‘11 by using the tutorials at Lynda.com on any GroundWorks computer.
Step 1: Prepare your project
- Open iMovie ’11 by clicking the icon on the Dock or by searching “iMovie” in spotlight.
- Select the project you want to export by locating it in the top-left Project Library panel list and double-clicking your project to open it.
Step 2: Export
Master
If your project settings are set up correctly, this will be the highest-quality video possible for your project. You can later use this MOV for burning to DVD using iDVD (Mac) or Windows DVD Maker (Windows).
- Click Share > Export using QuickTime…

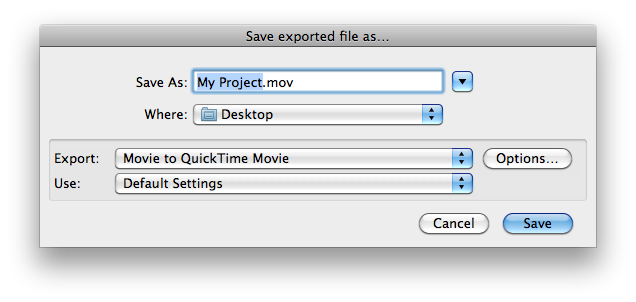
- In the Export dialog box

- Save As
- Choose a name for your video.
- Where
- Choose a save location, such as your external hard drive.
- Make sure “Movie to QuickTime Movie” is selected for “Export.”
- Choose a name for your video.
- Click “Options…”

- Under Video, click “Settings…”

- Select “Apple ProRes 422” for “Compression Type.”
- Click “OK.”
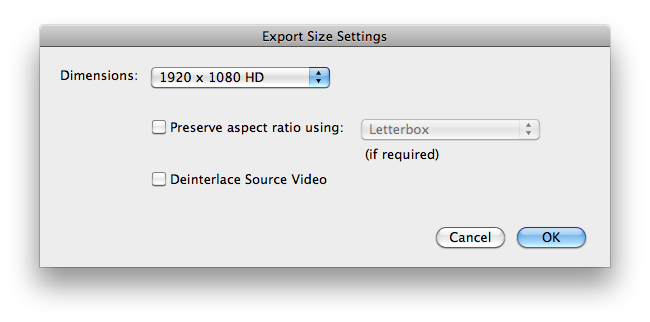
- Under Video, click “Size…”

- Select “1920 x 1080 HD” for 1920×1080 or 1440×1080 (1080p) videos, “1280 x 720 HD” for 1280×720 (720p) videos, or “640 x 480 VGA” for 720×480 (SD) videos for “Dimensions.”
- Click “OK.”
- Under Sound, click “Settings…”

- Select “Best” for “Quality.”
- Click “OK.”
- You can check the “Prepare for Internet Streaming” box and select “Fast Start.” It is recommended to uncheck this box.
- Click “OK.”
- Under Video, click “Settings…”
- Click “Save.”

H.264
This will be a compressed MOV version of your project that is recommended for nearly all means of distribution, including being uploaded to YouTube or any other video sharing website.
- Click Share > Export using QuickTime…

- In the Export dialog box

- Save As
- Choose a name for your video.
- Where
- Choose a save location, such as your external hard drive.
- Make sure “Movie to QuickTime Movie” is selected for “Export.”
- Save As
- Click “Options…”
- Under Video, click “Settings…”
- Select “H.264” for “Compression Type.”
- Select “Automatic” for “Key Frames.”
- Uncheck the “Frame Reordering” box.
- Select “Restrict to” and enter a value between 5000-8000 kbits/sec for “Data Rate.”
- Select Streaming for Optimized for.
- Click OK.
- Under Video, click Size…

- Select “1920 x 1080 HD” for 1920×1080 or 1440×1080 (1080p) videos, “1280 x 720 HD” for 1280×720 (720p) videos, or “640 x 480 VGA” for 720×480 (SD) videos for Dimensions.
- Click OK.
- You can check the “Prepare for Internet Streaming” box and select Hinted Streaming.
- Click OK.
- Under Video, click “Settings…”
- Click Save.

Summary and last steps
You now have a high-quality video file made from your iMovie ‘11 project that is ready for archiving and/or distribution! Again, be sure to take all of your files with you when you leave GroundWorks.
This tutorial was written by GroundWorks Consultant Stephen Ratkovich.


