Contents
Overview
This document covers the step-by-step process for starting a new iMovie ‘11 (version 9) project on Mac OS X. iMovie is a basic video editing software and is recommended for video editing beginners. For a full-featured video-editing suite, the Digital Media Commons recommends using Final Cut Pro or Premiere Pro.
Note: iMovie ‘11 projects are mostly compatible with Final Cut Pro 7 and Final Cut Pro X but not vice versa. iMovie ‘11 projects can be imported into Final Cut Pro 7 and then into Adobe Premiere Pro but not vice versa.
Before you get started
- GroundWorks does not have any means of long-term storage for your files. User files on a GroundWorks computer are not safe from deletion. It is highly recommended to bring an external hard drive in which to store all your files. External hard drives are available for purchase at the Computer Showcase.
- It is recommended that you work on your project from your external hard drive.
- iMovie ‘11 natively supports uncompressed SD and HDV, uncompressed HD, RAW camera formats, Panasonic P2, DVCPRO HD, and Sony XDCAM HD.
- There is no manual save feature in iMovie ‘11; everything is saved automatically to your specified locations when you create a new project and event.
- Learn more about iMovie ’11 by using the tutorials at Apple.com. Learn everything you need to know about iMovie ‘11 by using the tutorials at Lynda.com on any GroundWorks computer.
Step 1: Set up your preferences
- Open iMovie ‘11 by clicking the icon on the Dock or by searching “iMovie” in spotlight.
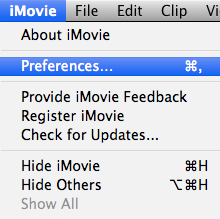
- Click iMovie > Preferences…

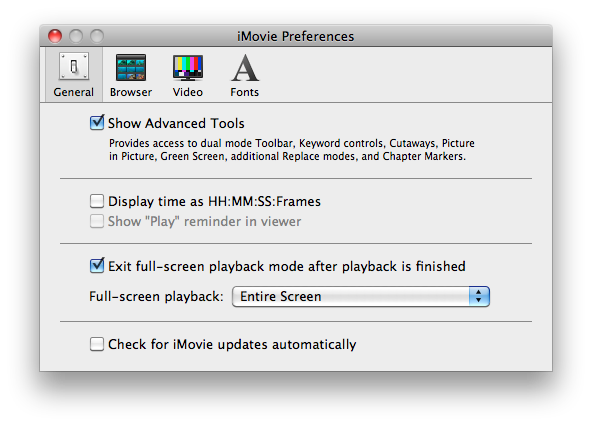
- Under the General tab

- Make sure the “Show Advanced Tools” box is checked.
- Under the Browser tab

- Make sure the “Show Fine Tuning” controls box is unchecked.
- You can use this feature at any time without having to check this box by holding Command + Option to reveal an orange handle to more precisely add or subtract frames or seconds from a beginning or end of a clip within your project.
- You can customize what happens when you click in the Event Browser.
- Select “Clicking in Event Browser selects entire clip” for the whole clip to be highlighted by default.
- Select “Clicking in Event Browser selects [#]s” so that only a custom portion of the clip will be highlighted where the yellow handles can be moved to add or subtract from the selection.
- Make sure the “Show Fine Tuning” controls box is unchecked.
- Under the Video tab

- Select “Full – Original Size” for “Import HD video as.”
- Click the red “X” button in the top of the iMovie Preferences window to save and close.
Step 2: Start a new event
- In the Event Library panel, make sure “Group events by Disk” is enabled by clicking the button, which turns it blue.

- Choose a save location, such as your external hard drive, from the list by clicking on it.
- Click File > New Event.

- A new event will be added to the list and an iMovie Events folder will be created on the root of your save location. You can change the name of your event within the Event Library panel. Do not edit or move your event folder in Finder; everything must be changed within iMovie or risk data loss.
Step 3: Start a new project
- In the Project Library panel, make sure your save location, such as your external hard drive, is selected from the list by clicking on it.
- Click File > New Project…

- In the New Project dialogue box

- Project Themes
- “No Theme” is selected by default, but you can choose a theme that will apply predetermined titles, animations, and transitions to your project.
- Name
- Change the name of your project file.
- Aspect Ratio
- Select “Widescreen (16:9)” if your source footage is 1920×1080 or 1440×1080 (1080p) or 1280×720 (720p).
- Select “Standard (4:3)” if your source footage is 720×480 (SD).
- Frame Rate
- Select an fps (frames per second) that most closely matches your source footage (typically “30 fps – NTSC”).
- Project Themes
- Click “Create.”
- Your project will automatically open up replacing the Project Library panel and an iMovie Projects folder will be created on the root of your save location. You can change the name of your project within the Project Library panel. Do not edit or move your project folder in Finder; everything must be changed within iMovie or risk data loss.
Summary and last steps
You now have an iMovie project that is ready for editing your specific videos! Again, be sure to take all of your files with you when you leave GroundWorks.
This tutorial was written by GroundWorks Consultant Stephen Ratkovich.