Contents
Overview
This how-to guide covers the step-by-step process for scanning single- or double-sided documents or images, in color or black and white, using either of the Fujitsu scanners shown below.
Note: If you want to scan film strips or slides, see How to Scan Negatives and Slides Using EPSON Scan. If you are at a station with an Epson scanner, see How to Scan Documents and Images Using EPSON Scan.
Before you get started
Which scanner are you using? The Fujitzu fi-5750C has an Automatic Document Feeder (ADF) mounted on top of an 11×17 flatbed scanner. The Fujitsu fi-6670A is only an ADF, with no flatbed.

A – ADF stacker
B – Automatic Document Feeder (ADF)
C – ADF side guide button
D – ADF paper chute
E – Flatbed scanner cover
F – Flatbed scanner handle and latch
ADF scanners can scan up to 200 letter size pages and smaller, or up to 100 sheets of any larger sizes. They’re great if you have a lot of pages you want to turn into a PDF, because they’re far faster than scanning each page on a flatbed scanner.
Be sure you have a flash drive, external hard drive, or other means of taking your files with you when you leave.
Preparing your document
ADF
- Move the side guides out of the way by squeezing both side guide buttons and gently moving them apart.
- Align the edges of your sheets and place them on the ADF paper chute facedown with the top edges of the sheets facing inward towards the ADF.
- Adjust the side guides so that they contact both sides of your sheets.
- Adjust the stacker to accommodate the paper size and stack height of your sheets.
Flatbed
- Access the flatbed scanner by squeezing the latch under the handle located on the cover at the front of the scanner.
- Place your document or image facedown aligned with the top-left corner of glass.
- Lower the cover as far as possible so that your document or image lays flat on the glass.
Setting up the scanning software (PDF file)
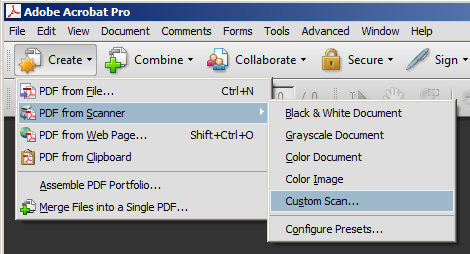
- Open Adobe Acrobat Pro.
- Click Create > PDF from Scanner > Custom Scan.
- In the Custom Scan window, select “FUJITSU fi-5750Cdj” for the fi-5750C or “Kofax Software VRS – TWAIN” for the fi-6670A for “Scanner.”
You may get a warning message saying that there are multiple scanner drivers detected. Click “OK.”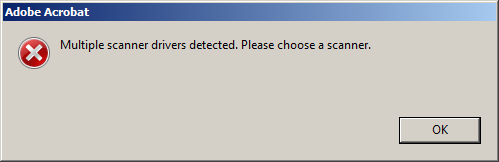
- In the Custom Scan window, select “FUJITSU fi-5750Cdj” for the fi-5750C or “Kofax Software VRS-TWAIN” for the fi-6670A.
If you want to scan multiple stacks of documents or images with the ADF or multiple sheets with the flatbed, check the “Prompt for scanning more pages” box in the Custom Scan window.
If you want your document or image(s) scanned for text that can later be searched for and highlighted, make sure the “Make Searchable (Run OCR)” box is checked.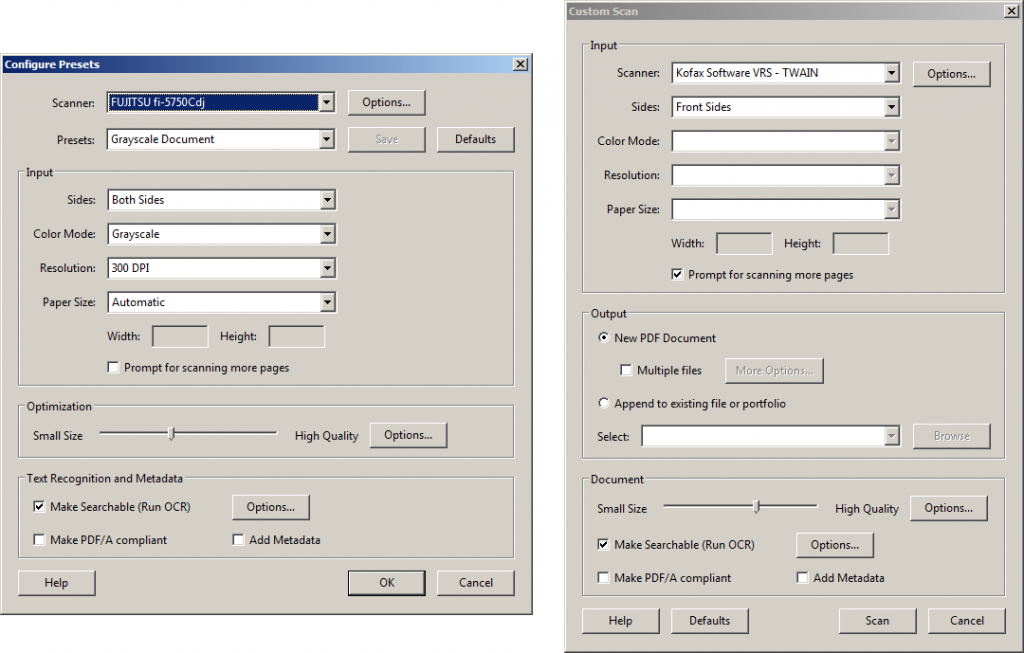
Left: “Kofax Software VRS-TWAIN” for the fi-6670A. Right: “FUJITSU fi-5750Cdj” for the fi-5750C.
- Click “Options…” to the right of the “Scanner” drop-down menu and select “Show Scanner’s Native Interface” for “User Interface.”
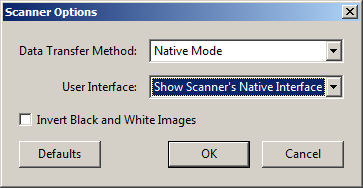
- Click “OK.”
- Click “Scan.”
- Adjust your scan settings.

fi-5750C
In the TWAIN Driver (32) window (in Adobe Acrobat Pro):
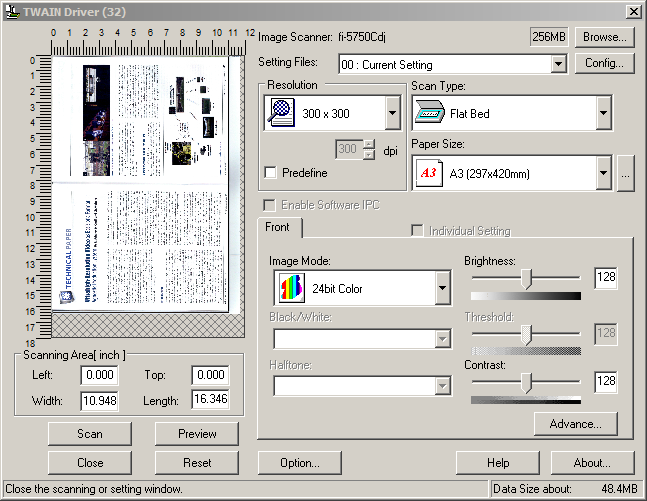
- Choose the resolution (quality) of your scanned document or image.
150-300 is recommended for documents.
300-600 is recommended for images. - Are you scanning single-sided or double-sided pages?
Select “ADF (Front Side)” to scan single-sided sheets with the automatic document feeder.
Select “ADF (Duplex)” to scan double-sided sheets with the automatic document feeder.
Select “Flat Bed” to scan one sheet at a time with the flatbed scanner. - For ADF, select the appropriate paper size depending on the largest size document or image in your stack.
For flatbed, select “Custom” or select the exact paper size of your document or image. - Are you scanning in color or black and white?
Select “24bit Color” for documents and images you want in color.
Select “Grayscale” for documents and images you want in black and white.
Select “Black & White” for documents and images you want in only black or white (there will be no gray).
fi-6670A
In the Kofax VRS window (in Adobe Acrobat Pro):
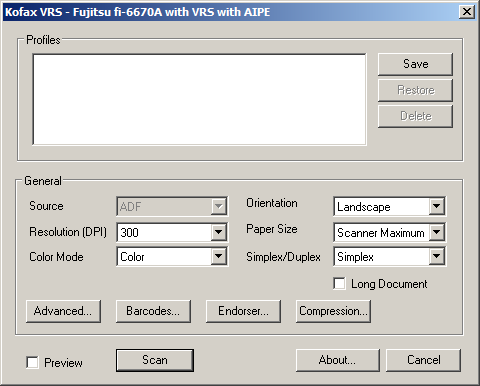
- Make sure the “Preview” box towards the bottom of the window is unchecked.
- Select “Portrait” if the short end of the sheet is facing towards the ADF
Select “Landscape” if the long end of the sheet is facing towards the ADF - Choose the resolution (quality) of your scanned document or image.
150-300 is recommended for documents.
300-600 is recommended for images. - Select “Scanner Maximum” to automatically determine paper size, or select the exact size from the drop-down list of common paper sizes.
- Are you scanning in color or black and white?
Select “Black/White” for documents and images you want in only black or white (there will be no gray).
Select “Grayscale” for documents and images you want in black and white.
Select “Color” for documents and images you want in color. - Are you scanning single-sided or double-sided pages?
Select “Simplex” to scan only the front of your sheets.
Select “Duplex” to scan both the front and back of your sheets.
Scan and save (PDF file)
ADF
- Click “Scan.”
- If you checked the “Prompt for scanning more pages” box in the Custom Scan window, you will be asked if you have completed scanning and proceed to your PDF file or to continue scanning and return to the TWAIN Driver (32) or Kofax VRS window. Make your selection and click “OK.”
- Click the “Save” button or File > Save to save your PDF file.
- Choose a save location and click “Save.”
Flatbed
- Click “Preview.”
- Look over your document or image to be sure if it was completely scanned.
If you notice that an edge has been cut off, select “Custom” for “Paper Size” and click “Preview” again.
If you notice that there is extra white space, click and drag a selection box around the area of your preview you would like to have scanned. - Click “Scan.”
- If you checked the “Prompt for scanning more pages” box in the Custom Scan window, you will be asked if you have completed scanning and proceed to your PDF file or to continue scanning and return to the TWAIN Driver (32) window. Make your selection and click OK.
- Click the “Save” button or File > Save to save your PDF file.
- Choose a save location and click “Save.”
Setting up the scanning software (image file)
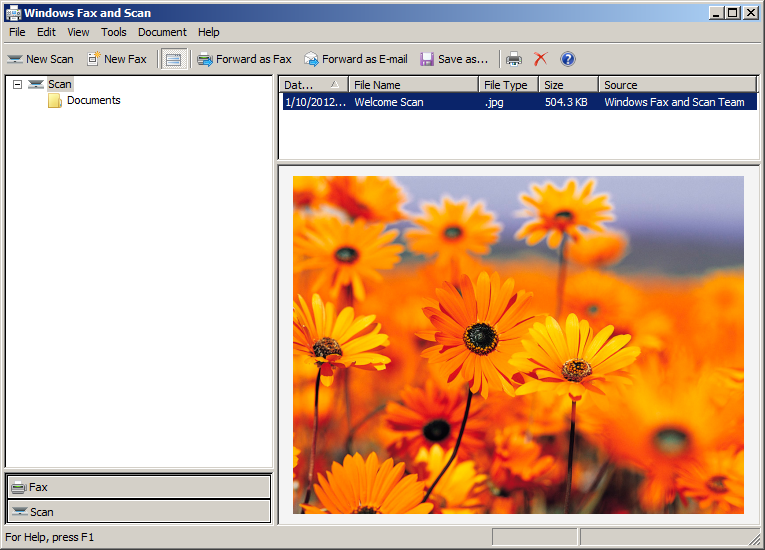
Open Windows Fax and Scan.
- Click “Scan” in the lower-left of the Windows Fax and Scan window if the software is in “Fax” mode.
- Click “New Scan” towards the top-left of the Windows Fax and Scan window.
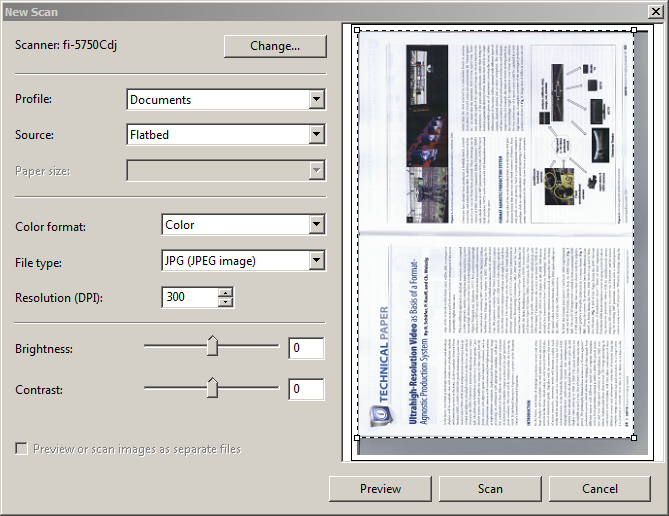
- In the New Scan window, select “Photo” to scan an image with no or minimal text.
- Select “Flatbed” to scan one sheet at a time with the flatbed scanner.
Select “Feeder (Scan one side)” to scan single-sided sheets with the automatic document feeder.
Select “Feeder (Scan both sides)” to scan double-sided sheets with the automatic document feeder. - Are you scanning in color or black and white?
Select “Color” for images you want in color.
Select “Grayscale” for images you want in black and white.
Select “Black and white” for images you want in only black or white (there will be no gray). - How do you want to save your file?
Select “JPG (JPEG image)” for images you want in a compressed .jpg format.
Select “PNG (Adobe Fireworks PNG File)” for images you want in a compressed .png format.
Select “TIF (TIF File)” for images you want in a minimally compressed .tif format. - Choose the resolution (quality) of your scanned document or image. 300-600 is recommended for images.
Steps 3-7.
Scan and save (image file)
ADF
Click “Scan.”
Your document or image(s) will now show up in the list of scanned sheets. All image files will be automatically saved to Documents > Scanned Documents on the computer.
Flatbed
- Click “Preview.”
- If you notice that there is extra white space, click and drag the corners of the selection box around the area of your preview you would like to have scanned.
- Click “Scan.”
Your document or image(s) will now show up in the list of scanned sheets. All image files will be automatically saved to Documents > Scanned Documents on the computer.
Summary and last steps
You now have a PDF or image file(s) of your document or image(s)! Feel free to edit and rename any of your files. Remember to save and take your file(s) with you either by moving everything to flash drive, external hard drive, self-addressed e-mail, or some other means.
This tutorial was written by GroundWorks Consultant Stephen Ratkovich.